Whether you’re leading a business meeting, teaching a class, marketing your latest product, or presenting your research findings, PowerPoint is a powerful program that can make your content pop. Here are six tools that can take your presentation to the next level.
Morph Transition: Create an Impressive Visual Flow
The Morph transition feature is available in PowerPoint for Windows and Mac (2019 and later), the web, Android, and iOS.
Many of us have seen and created PowerPoint presentations with objects and text that are static or—at best—have basic animations attached to them.

Related
Everything You Need to Know About Animations and Transitions in PowerPoint
Make your presentations stand out.
However, the Morph transition truly keeps your audience engaged by creating the illusion that objects are moving, resizing, rotating, or changing appearance. What’s more, you don’t need to add manual motion paths to create this impressive effect.
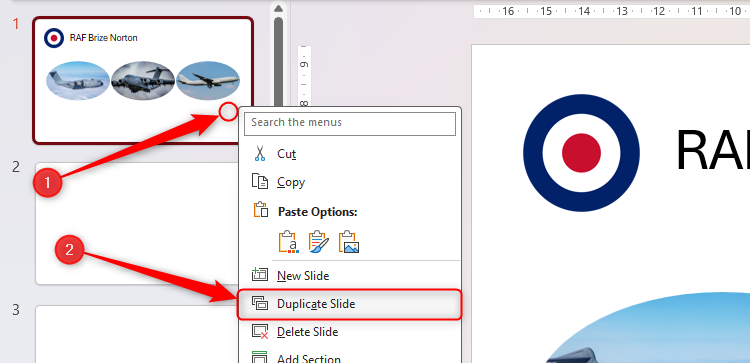
The easiest way to use the Morph transition is to duplicate a slide before adjusting the objects on the second slide. First, in the thumbnail pane, right-click the slide you want to apply the transition to, and select “Duplicate Slide.”
Then, make changes to the duplicated slide, such as changing the size of the objects or moving their positions. You can also add or remove items, as long as at least one object remains in common between the two slides.
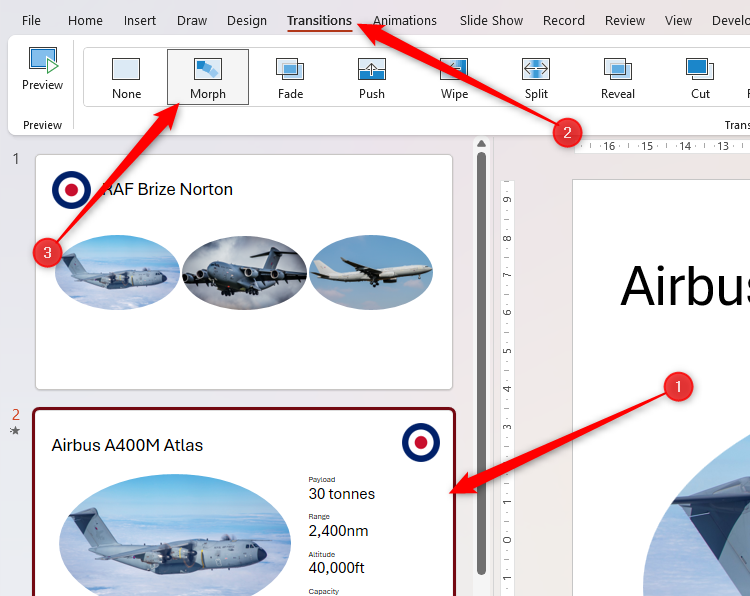
Now, with the second slide still active, open the “Transitions” tab, and click “Morph.”
Click “Effect Options” in the Transitions tab for more Morph options.
Finally, click “Preview” to see the impressive Morph transition in action.
3D Models With Morph: Add Dynamic and Immersive Illustrations
This combination of tools is available in PowerPoint for Windows and Mac (2019 and later), the web, Android, and iOS. You can add 3D models without using the Morph tools in all versions of PowerPoint.
As well as using the Morph transition to give the impression that 2D text, pictures, and graphics are moving within the presentation, you can go one step further and combine the effect with 3D models.
Related
Combine 3D Models and Morph in PowerPoint to Create Stunning Visuals
Impress your audience with rotating graphics.
First, to add a 3D model, in the Insert tab on the ribbon, hover over “3D Models.” Then, click the top half of the split button to browse Microsoft’s gallery, or click the bottom half to upload your own.
If you choose the option to insert a model saved on your device, once you’ve located the graphic, click “Insert.” On the other hand, if you decide to select one of Microsoft’s stock models, you’ll see a dialog box containing various model categories. Here, either click one of the categories, or enter the relevant keywords into the search bar at the top of the window.
Once you find the ideal model to add to your PowerPoint presentation, click it once to select it, and click “Insert.”
Now, click and drag the icon in the center of the model to define how it will look when people first see this slide.
Next, add any further details to the slide, like formatting or text.
The next step in creating the impression that the model is moving is to add a slide that contains the same model but from a different perspective. To do this, in the thumbnail pane, right-click the slide you just created, and select “Duplicate Slide.”
Now, click and drag the icon in the center of the duplicated 3D model to define how it will look once the rotation is complete. Also, edit any text or other content to match what the 3D model will display
Finally, you need to link the two slides together so that PowerPoint recognizes the connection between their contents. To do this, select the second slide in the thumbnail pane, and in the Transitions tab on the ribbon, click “Morph.”
Now, when you click “Preview” in the Transitions tab—or press F5 on your keyboard—you’ll see this magnificent 3D effect in action.
Color Matching: Achieve Presentational Consistency in Seconds
The Eyedropper tool is available in PowerPoint for Windows (2016 and later) and Mac (2021 and later).
Before I learned this trick, I would waste far too much time trying to make the colors of the text, borders, and objects on my slides match. Then, the Eyedropper tool came to the rescue.
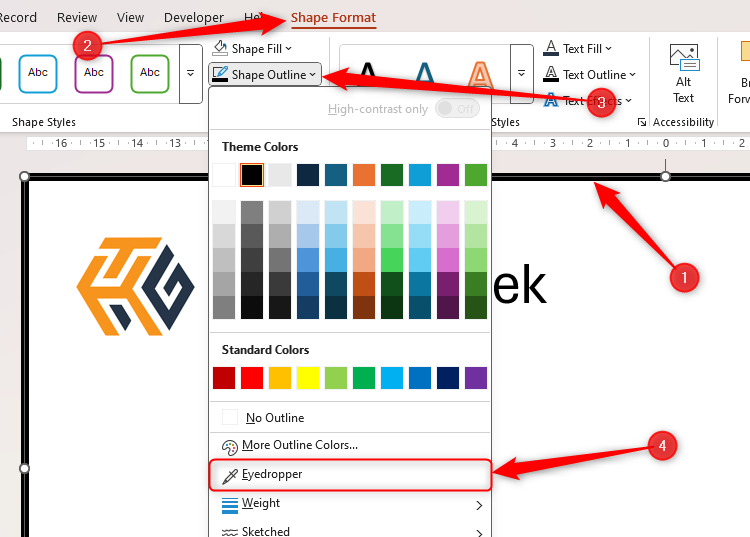
In the example below, let’s imagine you want the border around the edge of the slide to be the same color as the “H” and “T” in the How-To Geek logo and the title to be the same color as the “G.”
However, achieving an exact color match by eye would be pretty much impossible. Instead, first, select the slide border, and in the Shape Format tab on the ribbon, click Shape Outline > Eyedropper.
At this point, your cursor turns into a pipette and a color palette that changes color when you hover over different parts of the slide. In this case, since you want the border to be HTG orange, hover over the relevant part of the logo until the palette turns the right color.
Then, click once to apply that color to the outline of the selected shape.
Finally, repeat the process for the slide title so that its text color matches the darker color in the logo.
Live Subtitles and Translations: Broaden Your Audience
The subtitles and translation features are available in PowerPoint for Windows (2024 and later), Mac (Microsoft 365), and the web.
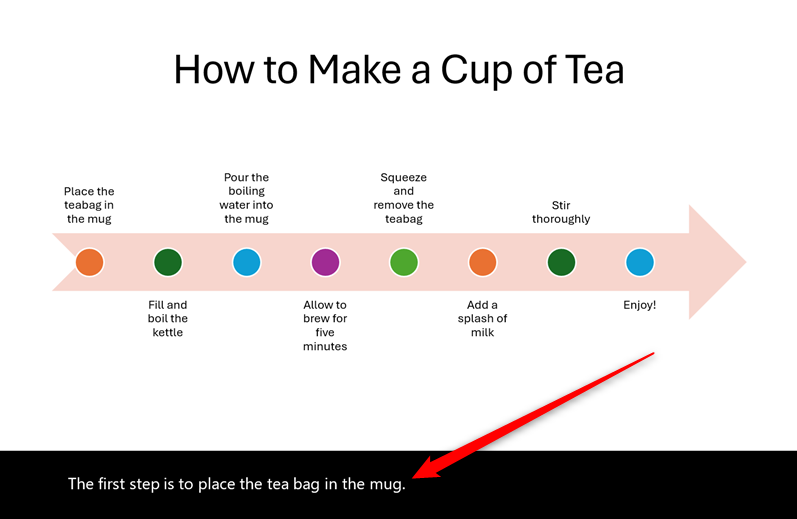
PowerPoint’s real-time subtitling tool is a great way to make your presentation accessible to more people. The program picks up your voice through your microphone, and adds subtitles to your slides as you speak, meaning those with hearing loss can enjoy your content as much as everyone else.

Related
8 Ways to Make Your PowerPoint Presentation Accessible to All
Maximize your audience in a few simple steps.
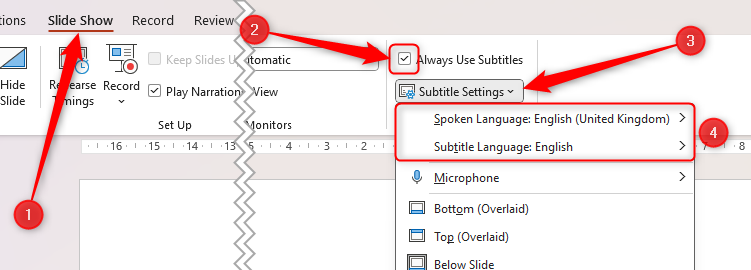
To activate this feature, check “Always Use Subtitles” in the Slide Show tab on the ribbon. Then, expand the “Subtitle Settings” drop-down menu to double-check that the spoken language matches the language you’re speaking in and that the subtitle language matches the language of your listeners.
When you press F5 to present your slideshow and start speaking, the subtitles will appear as if by magic in real time.
Even more impressively, if you change the subtitle language, PowerPoint translates your words as you speak.
Linked Excel Charts: Provide Real-Time Statistics
The linked Excel charts feature is available in PowerPoint for Windows (2016 and later).
Picture this: you’ve crunched some numbers in Microsoft Excel and visualized your data in wonderfully presented charts. Now, you want to duplicate these in PowerPoint, but you’re mindful that the figures—and, therefore, the charts—will likely change in the future. In this scenario, the linked charts tool is the perfect solution.
The first thing to note is that for the link between Excel and PowerPoint to work as expected, both files must be saved in the same location—such as your OneDrive account or local hard drive.
Head to your Excel workbook, select the chart you want to copy, and press Ctrl+C. Alternatively, right-click the chart, and select “Copy.”

Related
The 10 Most Common Excel Charts and What They’re Used For
Choose the best way to visualize your data.
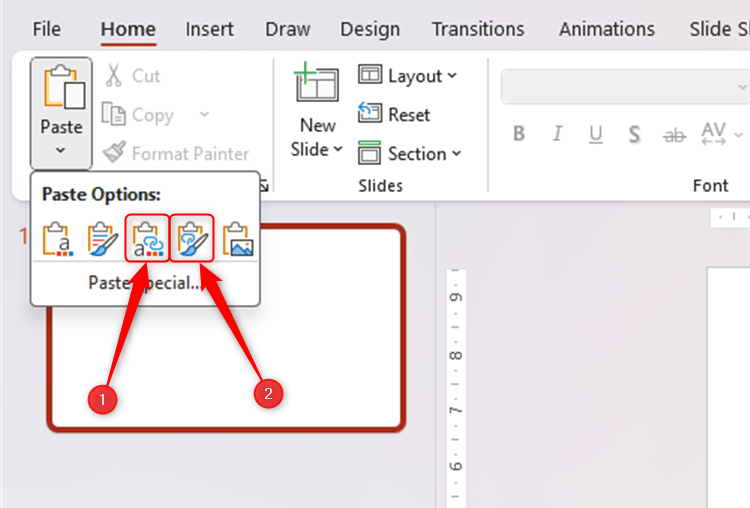
Then, activate the PowerPoint slide where you want to duplicate the live chart, and click the down arrow beneath the “Paste” button in the Home tab on the ribbon.
The key here is to select one of the options whose icons contain a chain link. The first option—which contains the lowercase letter “a”—adopts the theme you selected in your PowerPoint slide. On the other hand, the second option—which contains a paintbrush—keeps the formatting of the original chart in Excel.
Regardless of which of these buttons you select, when the source data in Excel changes, the link chart in PowerPoint updates accordingly. This is the case even if you’re midway through a presentation!
You can also use the same method to create a link between an Excel table and your PowerPoint file.
Cameo: Personalize Your Online Presentation
The Cameo tool is available in PowerPoint for Windows (2024 and later), Mac (2024 and later), and the web.
Online meetings and video conferences have been on the rise since the 1990s, bolstered by the introduction of broadband in the early 2000s, instant messaging apps, 3G and 4G smartphone technology, and—dare I mention—the pandemic.

Related
7 Essential Zoom Tips to Run Better Meetings
Get to know Zoom better.
As a result, increasing numbers of people have taken to delivering their PowerPoint presentations over the internet, but with that comes a marked loss of face-to-face interaction.
One way to overcome this lack of in-person interactivity is to use PowerPoint’s Cameo tool, which lets you embed a live camera feed of yourself directly into your slides.
Head to the “Insert” tab on the ribbon, click the bottom half of the split “Cameo” button to expand the drop-down menu, and decide whether you want your face to appear on the active slide only or all slides.
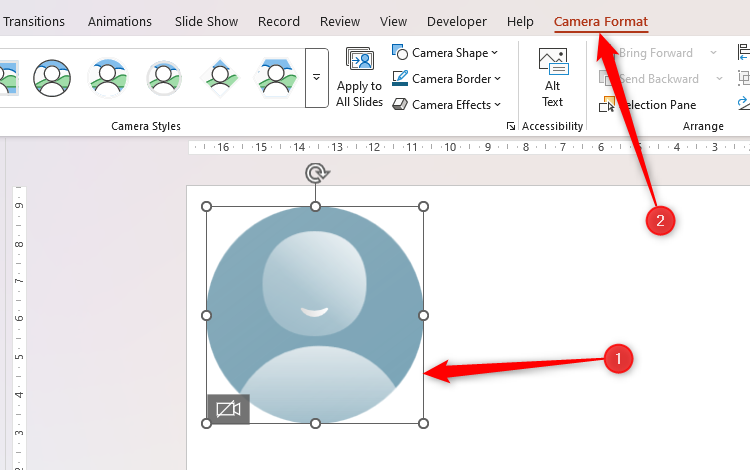
When you first add the camera to your slideshow, it may be disabled. Simply click the camera icon to turn it on and check that everything works as expected.
To change the properties of the live feed, such as its shape, size, and border, select the camera placeholder on the slide, and browse the options in the Camera Format tab on the ribbon.
Now, when you press F5 to begin your presentation, your audience will be able to see and hear you at the same time!

Related
Virtual PowerPoint Presentations Don’t Have to Be Boring: 7 Ways to Keep People Engaged
Don’t create “just another” virtual PowerPoint. Entertain your audience with an engaging presentation.
Alongside the tips discussed in this guide, there are many things I wish I’d known before I made my first PowerPoint presentation. For example, the Slide Master lets you make wholesale changes to your slides, you can remove backgrounds from images within the program itself, and the Designer feature makes your slides look top dollar.
