Windows 11 forces you to sign in with a Microsoft account during setup. However, two simple Command Prompt commands can bypass this requirement and create a local account instead.
What You’ll Give Up With a Local Account
While breaking free from a Microsoft account sounds great, there are a few points to consider before you make this change.
Using a local account means you’ll lose some Microsoft integration features. You won’t have automatic OneDrive backup, settings sync across devices, or the ability to use the Windows Backup app to restore files and settings from a previous PC during setup.
Device Encryption is another consideration. Windows 11 Home automatically enables Device Encryption with Microsoft accounts and stores recovery keys in the cloud. With a local account, you can’t enable Device Encryption without first switching to a Microsoft account. If this is an issue for you, VeraCrypt is a good free encryption solution that works on all account types.
Before you begin, disconnect your Ethernet cable if you’re using a wired connection. If Windows detects an active internet connection through Ethernet, it will automatically connect and proceed to download updates, and you won’t be able to execute the commands.
Method 1: Bypass the Network Requirement
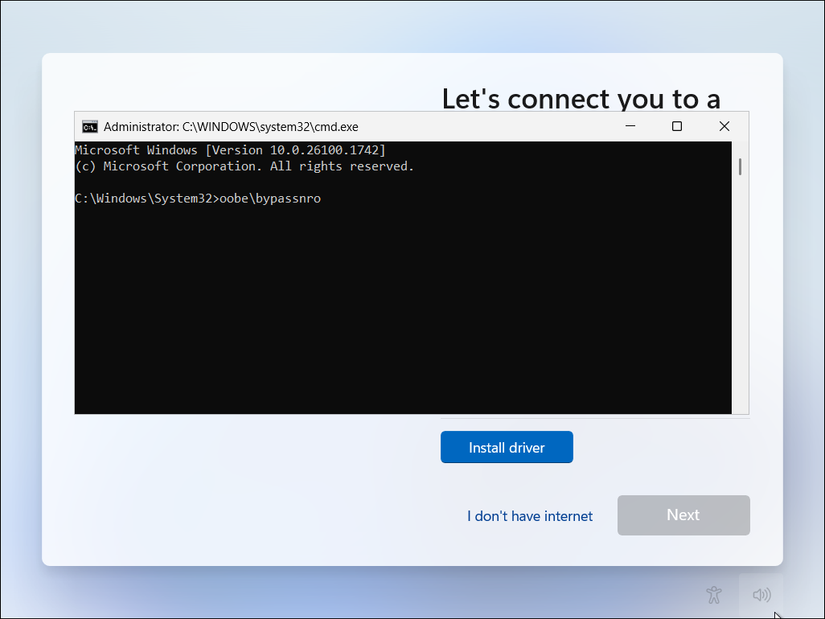
Start the Windows 11 installation process and go through the initial steps where you select your language, time zone, and keyboard layout. Continue until you reach the Let’s connect you to a network screen. This is where Windows 11 forces you to connect to the internet to download updates and sign in with a Microsoft account.

At this screen, press Shift + F10 on your keyboard to open Command Prompt. In the Command Prompt window, type the following command:
OOBE\BYPASSNRO
After typing the command, press Enter. Your computer will immediately restart and return to the beginning of the setup process. This restart is part of the bypass process and will not reset your installation. The command you just ran modified a registry setting that tells Windows to allow offline setup.
After the restart, go through the initial setup steps again. Select your region and keyboard layout, like before. When you reach the Let’s connect you to a network screen this time, click I don’t have internet in the corner of the screen.

Windows will present another screen asking if you want to connect. Click Continue with limited setup to proceed without an internet connection.
Windows will now let you create a local account. Enter the username you want for your account. You can add a password if you want, though it’s optional. If you do set a password, Windows will ask you to create three security questions. You’ll need these questions to reset your Windows 11 account password if you forget it.
Complete the remaining setup steps, which include choosing privacy settings for utilities like location services and diagnostic data. Once setup finishes, you’ll boot into Windows 11 with your local account.
Method 2: Set Up a Local Account
If the oobe\bypassnro command isn’t working, there’s another workaround. Start the Windows 11 installation process and go through the initial steps where you select your language, time zone, and keyboard layout.
When Windows 11 asks for your country or region, press Shift + F10 on your keyboard to open Command Prompt.

In the Command Prompt window, type this command:
start ms-cxh:localonly
Press Enter after typing the command. This will launch a Create a new user account dialog. Enter your username and password and click Next to create a local user account. You can use the same account to complete the setup.

Continue through the remaining setup steps, including privacy settings for location services and diagnostic data. Once setup finishes, you’ll boot into Windows 11 with your local account.
After setting up Windows 11 with a local account, you can connect to the internet whenever you’re ready. Head to Settings > Windows Update to download important security updates and drivers. Some features, like the Microsoft Store, will still require a Microsoft account to function fully. But you can use most of Windows 11’s core features with your local account.

You can always add a Microsoft account later if you change your mind. Go to Settings > Accounts > Your info and click Sign in with a Microsoft account instead. This links your local account to a Microsoft account while preserving your files and installed programs.
As of this writing, our testing confirmed both of these methods continue to work in the latest version of Windows 11 (24H2). Microsoft could remove these bypasses in future updates, but for now, these are the best ways to create a local account during Windows 11 setup and skip the Microsoft account requirement.
Remember to keep your local account password saved somewhere safe, since there’s no safety net to reset it like with a Microsoft Account password.