Most of us use the Photos app to view, rotate, or crop pictures, not realizing it’s evolved into a tool that offers much more than basic editing. If you think of it as just a simple image viewer, it’s time to take another look—its latest features now rival those offered by third-party photo apps.
Resize images to any dimension you want
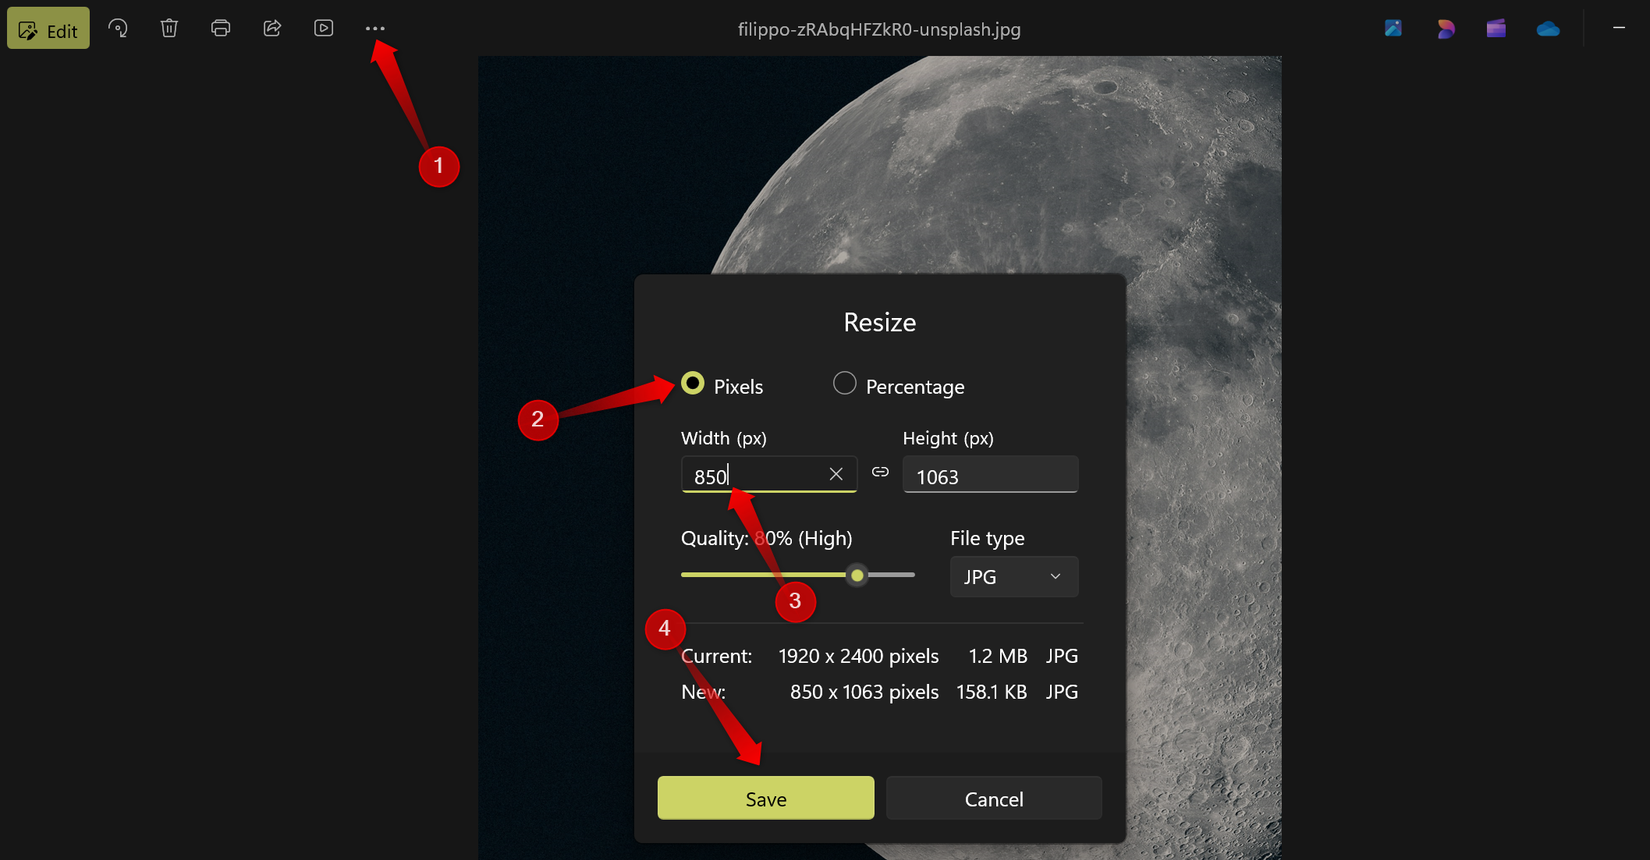
As a writer, I often work with images, and one of my most frequent tasks is resizing them to fit within different CMS platforms I use. In the past, I relied on a third-party app for this, but now I can adjust image dimensions using the resize feature in the Photos app. It automatically preserves the aspect ratio, preventing distortion and keeping images looking natural.
To resize an image, click the three-dot menu in the top-right corner and select “Resize Image.” You can then choose to resize by “Pixels” or “Percentage.” With the Pixels option, enter your desired width, and the height will adjust automatically. Alternatively, use the Percentage option to reduce the image size by a specific amount.
You can also change the “File Type” at this stage. After resizing the image to your preferred dimensions, click “Save” to either replace the original file or create a new copy.
Find the right image using filmstrip view
When using the Photos app to browse through a folder in search of a specific image to edit, you often have to flip back and forth between files. That’s manageable with a handful of images, but with hundreds, it quickly becomes tedious and time-consuming. Sure, you could close the app to manually find the image, but that’s inefficient and breaks your workflow.
To save yourself that hassle, use the Filmstrip View feature. It displays a strip of image thumbnails at the bottom of the window, letting you quickly scroll through and find the photo you need without leaving the app. To enable it, click the Filmstrip View icon in the bottom-left corner, select your image, and start editing. When you’re done, click the same icon to close the view.
The Photos app now includes Optical Character Recognition (OCR) support, allowing you to extract text from images and paste it elsewhere. This means the app doesn’t just display images anymore—it can read them too. If you’re a student or frequently work with handwritten notes, this feature makes it easy to digitize your content.
However, if the text in the image is blurry or angled, it might not be recognized accurately. To use OCR, open an image and click the “Scan Text” icon located at the bottom center of the screen. The app will analyze the image and highlight any detectable text for copying. You can press Ctrl+A to copy all text or manually select portions to copy.
If this option doesn’t appear at the bottom center, it means the app couldn’t detect any readable text in the image, so text extraction isn’t available for that file.
Edit, blur, or remove images
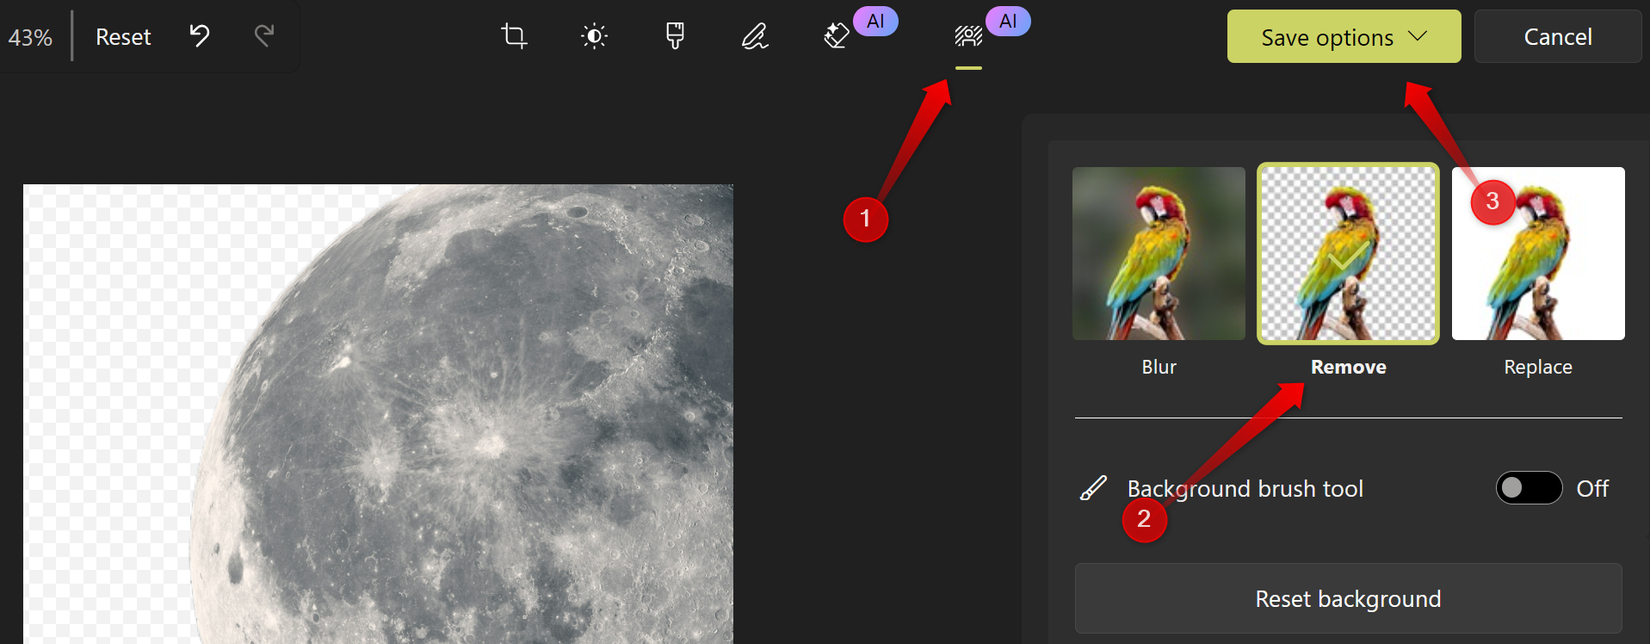
When it comes to image editing, the Photos app has evolved far beyond simple cropping and rotation. It now lets you blur the background to hide cluttered surroundings, remove the background entirely, or replace it with a solid color—helping your subject stand out more clearly. However, note that you currently can’t replace the background with another image.
To use this feature, open your photo, click “Edit” to enter edit mode, and navigate to the “Background” tab. The Photos app will automatically detect and separate the subject from the background, presenting three options: Blur, Remove, or Replace Background. Choose your preferred choice, preview the result, and fine-tune the Blur Intensity if needed.
Once you’re happy with the result, expand the “Save Options” dropdown to save your edited image.
Hide specific areas of an image
There are times when you only need to blur a specific part of an image—such as hiding personal details or sensitive information. For that, the Photos app includes an AI-powered Generative Erase feature. It allows you to brush over the area you want to conceal, and if the “Auto Apply” toggle is enabled, the app will instantly hide that section.
To use it, open your image, switch to edit mode, and go to the “Generative Erase” tab. Then, adjust the brush size and paint over the portion you want to hide. The app will intelligently remove or blur that section by filling in the background. Keep in mind, though, that this feature is still in its early stages, so some pixels might remain visible while others blend unevenly.
What was once a simple image viewer has now evolved into a powerful all-in-one photo hub. Try out the features mentioned above—you might be surprised by how much creative control and practical utility the Photos app now offers. As generative AI continues to improve, Microsoft might add even more features in the future—so stay tuned.


