If you’re the owner of a shared Google Sheets spreadsheet, you might routinely open the file to see whether any changes have been made. However, this process can be time-consuming, especially if the worksheet contains lots of data. This is where the conditional notifications tool comes in handy.
For example, maybe you want to track changes to a particular column in a table or be notified when a certain value is entered into a cell. Perhaps you’re monitoring a budget or stock levels, and you want to be made aware when you’re getting close to the threshold. In all these scenarios, you can force Google Sheets to send you an email to alert you to changes made.
At the time of writing (July 2025), conditional notifications in Google Sheets are only available to people using Business, Enterprise, or Education Google Workspace accounts. This is because the tool is intended for shared worksheets in collaborative environments.
Selecting the Trigger Range for Conditional Notifications
The first step when using conditional notifications is to select the cell or cells that will trigger the notification. Right-click any cell in your Google Sheets spreadsheet, and click “Conditional Notifications.”

Now, in the Rule Name field of the pane that appears on the right, type an appropriate title for the rule you’re about to set.

If your worksheet contains a formatted Google Sheets table, the program automatically assumes that you want to apply the rule to a column in that dataset, so you’ll see the table’s name already entered into the “In This Table” field.
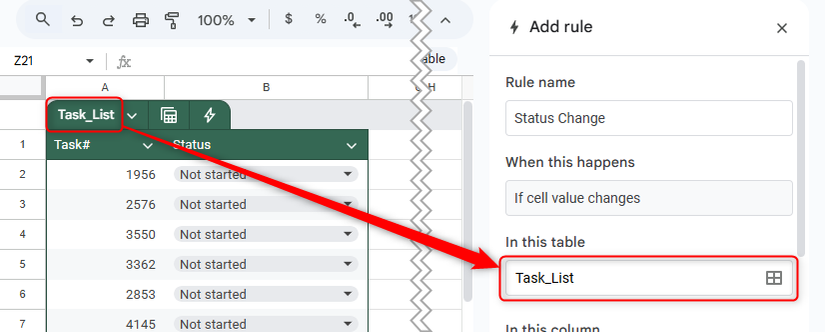
If this assumption is correct, select the appropriate column in the “In This Column” field. In my case, I want to track the status of each task, so I’ll select the “Status” column.

However, if you want the rule to apply to part of the spreadsheet outside the table, click the grid icon in the “In This Table” field, delete the existing data range, identify the correct table, range, column, row, or cell, and click “OK.”

At this stage, you have a choice to make. On the one hand, you could go ahead and tell Google Sheets where you want the notifications to be sent whenever the values in any of the identified cells change (I’ll come to this soon). On the other hand, you can set additional rules.
Related
The Beginner’s Guide to Google Sheets
Find out how to do everything from sharing Sheets to automating tasks with macros.
Setting Additional Notification Rules
While you can be alerted to any change to the selected cells through conditional notifications, you can also create more specific criteria that must be met before the email is sent.
In the following example, imagine you want to be notified when the count of an item drops to 20 or below.

After naming the rule and identifying the appropriate column in the conditional notification pane, click “Add Condition.”

Now, in the “And Meets Condition 1” field, select a rule you want to apply. Specifically, you can trigger a notification if a cell in the selected range is populated, cleared, or contains or doesn’t contain certain text strings, dates, or values. In this case, you want to be notified when any of the values in the selected range are 20 or lower.

If necessary, repeat this process for a maximum of three additional conditions.
You can select a different column, range, or cell for each additional conditional notification rule, and the notification is only sent when all conditions are met.
Selecting the Email Addresses to Receive the Notification
Once you’ve set up the rules, you’re ready to nominate the email addresses that will receive the notification when the conditions are met, and there are two ways to do this.
The first method is to select “Manually Type Each Email” in the drop-down menu, and type the individual Gmail or Workspace email addresses (up to 10) that should be notified when the data changes, pressing Enter between each entry. In this case, all the nominated email addresses will receive the notification.

Alternatively, if you want notifications to be sent to different email addresses depending on the values that change, add the relevant email address to each row in the identified dataset, select “Choose A Column With Emails,” and select the appropriate column. In the example below, person 1 will receive a notification if the count of the first item drops below 20, person 2 will receive a notification if the count of the second item drops below 20, and so on.

The size of the range containing the email addresses must be the same as the size of the range containing the trigger cells.
Now that you’ve set up the rules and entered the email addresses, click “Save” to activate the notifications.

Now, when the criteria you set are triggered, an email notification will be sent to the specified addresses. Bear in mind, however, that the notification can take up to 30 minutes to arrive, and if more than one change is made in a short space of time, the notifications may be grouped into a single email.
The notification is sent on behalf of the person who set or last edited the rule.
The notification email contains details of which cell has changed, when it was changed, and what it changed from and to. You can also click the link to the cell to open the Google Sheets file and see more details.

Conditional Notifications: Points to Note
Here are some final pointers that will help you make the most of this useful, time-saving Google Sheets tool.
To see, edit, disable, or delete existing conditional notifications, click “Tools” on the ribbon, and select “Conditional Notifications.”

Then, in the conditional notifications pane, review the rules and make any necessary changes.

You can also see all the notifications sent in the past 30 days by clicking “View Trigger History” in the same pane.

You can then filter the triggers by rule name or status.
To prevent the nominated email addresses from being inundated with notifications, emails are not sent when the number formats of the trigger cells change (including the number of decimal places), if the change is triggered by a volatile function that updates each time a change is made to the spreadsheet, or if the data comes from an external source (such as via the IMPORTRANGE function).
Related
How to Use the IMPORTRANGE Function to Import Data From One Google Sheets File Into Another
This powerful function makes duplicating data simple.
To stop notifications coming to your email address if you’re not the rule-maker, go to the footer of a conditional notification email in Gmail, and click “Change What Google Sends You.”

Then, under Conditional Notifications, select “None,” and click “Save.”

Whether you use Google Sheets as a freelancer, at home, or at work, the software has many useful features—from the AI function that generates contextual text and summaries to the ability to turn an image into data—that are guaranteed to transform how you work with spreadsheets.