I cut the cable cord years ago, and like many people, I use my Windows PC as a media hub. It works great, but controlling the PC from the sofa has always been a pain. I’ve tried the Logitech wireless keyboard that many people use, and the Rii Wireless mini keyboard. They both work fine, but they feel clunky, and they’re very unpopular with the less tech-savvy people in my home.

While searching for a more elegant solution, it hit me. A wireless game controller could solve this problem, and I happened to have an old Xbox One wireless controller that wasn’t being used. After doing a little testing and reading, I was able to connect my Xbox controller to my computer, but the experience left much to be desired.
Undeterred, I did more sleuthing and found an app called JoyToKey. This lightweight shareware utility allowed me to map my joystick to keyboard shortcuts, turning my dusty Xbox controller into the perfect device to control my home theater PC (HTPC). This is how I did it.

Connecting My Xbox Controller to My HTPC
The first thing I needed to do was connect my Xbox controller to my PC. There are a few ways to connect: via a USB cable, a wireless adapter or Bluetooth. In my instance, I used Bluetooth.
On my computer, I clicked the start button > Settings > Bluetooth & Devices. From there, I clicked Add a device.

In the next dialog, there are three options. Choose the appropriate option for your connection. For my configuration, I chose Bluetooth.

At this point, I needed to power up my Xbox controller. First, I installed some fresh batteries. Next, I powered up my controller by holding down the X button in the center of the controller. When it powered up, the X started slowly blinking.
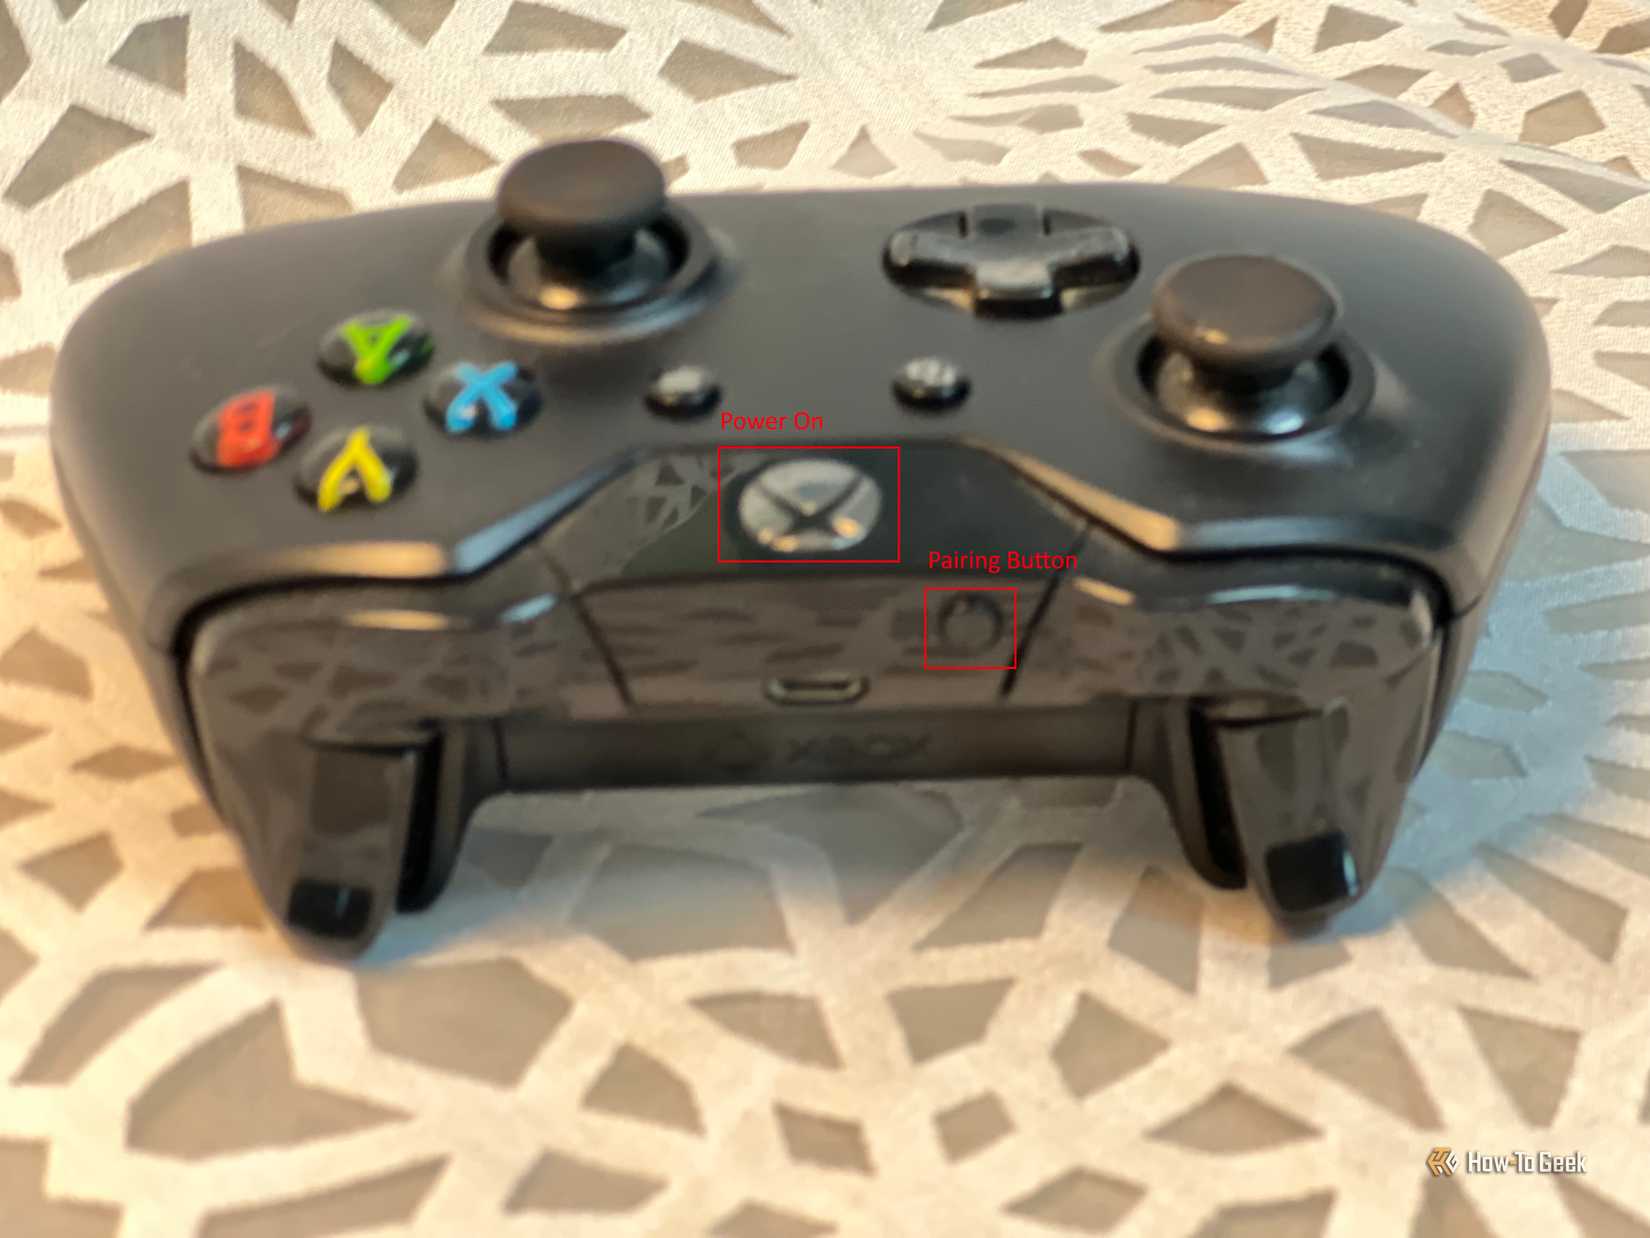
With the controller powered up, I needed to get it into pairing mode. There is a small button on the front of the controller. I had to press and hold it for three seconds, and I could see the X button started blinking faster, indicating it was in pairing mode.
On my computer, the Xbox controller appeared in the pairing dialog. I clicked on it, and success, my Xbox controller was paired with my PC. Now, I needed to map the controller.
Related
HTPCs Are Back: Plex Revives Its App For Home Theater PCs
HTPC owners, rejoice!
Using JoyToKey to Map the Controller
Using JoyToKey you can map keyboard and mouse inputs to any type of controller. It also supports profiles, allowing you to create and store different configurations. While it is free to try the program, a full license costs $7.50. To install JoyToKey, download the executable file and run the installer. When the setup finishes, the program will open.
Once the app opens, you’ll notice that when you click on any of the Xbox controller buttons or joysticks, they will be highlighted in JoyToKey, making it easy to see the controls you’re mapping. In the image below, I’m pressing the A button, and you can see the button light up in JoyToKey.
To get started, I renamed Profile 1 in the left column to Media Hub. Now it was time to start mapping the functionality that I wanted to use in my controller.

Configuring the Mouse
First, I set up the mouse function. I mapped the left joystick to the mouse movement. To do this, I double-clicked on the left arrow Stick 1 option, which opened the assignment editor. In the dialog at the top there are several tabs: Keyboard, Keyboard (Multi), Mouse, Mouse (Advanced), Text, and Special. To map the mouse movement, I clicked the Mouse tab and checked the correct direction in the Mouse Movement section. I clicked OK and then did the same procedure for the right arrow stick 1 option, the up arrow stick 1 option, and the down arrow stick 1 option.

This setting and several others have sliders. These indicate that you can increase the speed or sensitivity. In this case, the more the slider is increased, the faster the mouse will move. The mouse movement speed is by default set to 50 percent.
I had to map each of the four Stick 1 directions. When I was done, Joystick 1 controlled the mouse movement, and it looked like this.

Setting up the Right and Left Click of the Mouse
Next, I bound the A and B buttons to the right and left click of the mouse. I did this by double-clicking on the A button in JoyToKey, and when the assignment editor opened, I moved to the mouse tab and in the mouse click section, I checked left. I did the same thing for the B button, and the right click.

Setting up the Mouse Scroll
To finish the mouse controls, I needed to add the scroll wheel. I decided to bind mouse scrolling to the direction pad. I double-clicked on the direction pad with the up arrow and opened the assignment editor. In this image, you can see I moved the wheel rotation slider up all the way. Then I clicked OK.

Just like stick 1, I had to map the d-pad up, down, left and right. When I was done, all of my mouse controls were working on my Xbox controller. I could scroll up, down, left, and right.

Toggling Full Screen Video
On my computer, if I want to have my video go full screen, I simply hit the F key. I love this functionality and want to make it a part of my media hub controller. I mapped this to the View button that is on the left side of the Xbox button. This is labeled as button seven in JoyToKey. After double-clicking it, and bringing up the assignment editor, I went to the keyboard tab, typed an F, then clicked OK.

Now, when I’m surfing YouTube or watching videos, I can easily toggle full screen on and off.

Related
The Best Gaming Controllers of 2025
There’s a whole world of great controllers out there, just waiting to check them out.
Configuring Volume Controls
What media controller would be complete without a way to control the volume? I wanted to bind volume up to the left trigger, and volume down to the right trigger. To map this, in JoyToKey I double-clicked on the left trigger and opened the assignment editor and pressed the Fn+F3 keys, and then I clicked OK.

Now, I had to assign the right trigger to decrease my volume. I went through the same process. I double-clicked on the right trigger in JoyToKey and went to the keyboard tab. This time, I pressed the Fn+F2 together to assign volume down. When it was all done, I could control the volume of my computer using the right and left triggers on my controller.

Configuring the Virtual Keyboard
To make my controller as functional as possible, I wanted to have button access to the onscreen keyboard. In Windows, to bring up the virtual keyboard you press Ctrl+Windows+O. I mapped this functionality to the Menu button that sits just to the right of the Xbox button, on top, in the middle of the controller. I double-clicked on the menu button in JoyToKey and went to the keyboard tab. There, I put the keystrokes in one at a time, Ctrl at the top, the Windows button in the middle and then the O in the third box. After I clicked OK, it was all set.

Now I could, with a click of the menu button, bring up the Windows virtual keyboard and type out my email, or URL.
Setting up the Play and Pause Buttons
Any good media controller should have the ability to play and pause video. Of course, with the configuration that I’ve done here you could use the mouse and click the play or pause buttons, but I wanted this function mapped to my X button. I double-clicked on the X button in JoyToKey and assigned the keyboard shortcut to play and pause video, the space bar. Then I clicked OK.

The configuration was daunting at first, but after a few minutes in the JoyToKey UI it became easy to configure the things I cared about. Now, I have an elegant solution to my wireless keyboard woes, and my family and friends are more comfortable using it than my clunky wireless keyboard setup.