Want to try or install a Linux distribution (distro) on your computer? Making a bootable flash drive with an image of the distro is the simplest route these days. I’ve done it dozens of times, and it’s easy if you know what software to use.
First, Make Sure You Have Everything You Need
Before we get into the specific steps, let’s make sure you have everything you need. Generally it’s three things:
- Image-writing software
- A Linux distribution’s ISO or IMG file
- USB flash drive with no important data stored on it
The image-writing software you should use depends on which operating system (OS) is running on the PC you’re going to do the image writing with. I’ll tell you which to use and where to download it in the full instructions for that OS.
For the ISO or IMG file, go to the official download page of whatever distro you’re wanting to boot and find the download link. These files are typically multiple gigabytes in size and hosted on volunteer servers, so expect a long download time. This isn’t required, but it’s a good idea to run a checksum and compare it to one typically provided by the distribution’s website.
For the flash drive, make sure it uses a USB type that matches a working port on the device you plan to boot your Linux distro on. The ideal drive will have both USB-A and USB-C connectors so you’re prepared for either case.
I also recommend a USB drive of at least 12GB in size. That’s what Canonical recommends for Ubuntu, and Ubuntu is maybe one of the biggest ISOs out there. You might be able to get by with an 8GB drive, though, depending on the distro.

- Brand
-
SanDisk
- Capacity
-
512GB
- Speed
-
USB 3.2 Gen 2
- Connection
-
USB-A, USB-C
Amplify your data management with the SanDisk Extreme PRO Dual Drive, boasting read speeds up to 1,000MB/s and write speeds up to 900MB/s. Transition seamlessly between your USB-C and USB-A devices, and store tons of content with up to 2TB capacity.
I recommend going as high in USB generation as possible too. The higher the version number, the faster the data rate, and thus the faster your image can be written and the operating system can be booted. Any generation will work, though.
Before you proceed, make absolutely sure there is no data you want to keep on the drive. This process will delete everything on the drive, and it won’t be recoverable afterward.
How to Make a Bootable Linux Drive on Windows
On Windows 10 or 11, we recommend using Rufus. It’s been around for a long time and is well known as reliable and powerful.
To get started, go to the official Rufus website and scroll until you see a list of downloads. If you’re not sure which option to choose, go with the first one, as that applies to the vast majority of people.
After it finishes downloading, run the Rufus EXE file. It’ll ask for permission to make changes to your device, which is required for overwriting a disk like we’re about to do.
When you get to Rufus’ dialog, plug in the USB drive you want to use, and then make sure the drive is selected in the “Device” field. Click the “Select” button next to the “Boot Selection” field and find the ISO or IMG file you downloaded. Double-check everything is correct—the other settings’ defaults are usually fine—then click the “Start” button at the bottom of the dialog.

Rufus may give you an “ISOHybrid” warning, but just go with the recommended option. If something goes wrong, you can always go back and redo it with the other option. Rufus will also warn you that the selected device’s data will all be destroyed, so confirm you chose the correct device and click OK.
Now all that’s left to do is wait. How long it takes depends on several factors, so go get a cup of coffee while Rufus does its work.
When the writing was successful, Rufus’s status bar will change back to a green “Ready” message. You’re now ready to boot your Linux USB drive.
How to Make a Bootable Linux Drive on Mac
For writing Linux images to a USB drive on Mac, I recommend Raspberry Pi Imager. While it was designed for use by people installing OSes on their Raspberry Pi, in our testing it actually works well for any Linux distro meant for any computer.
To get started, go to the Raspberry Pi software page and look for the “Download for macOS” button to get the Imager DMG file. Double-click it and drag Raspberry Pi Imager over to your Applications folder.
Next, plug in your USB drive and launch Raspberry Pi Imager. You’ll see a few buttons. Ignore the first “Raspberry Pi Device” button and instead, under Operating System, click “Choose OS.”
In the menu that appears, scroll until you see “Use Custom” and click it.
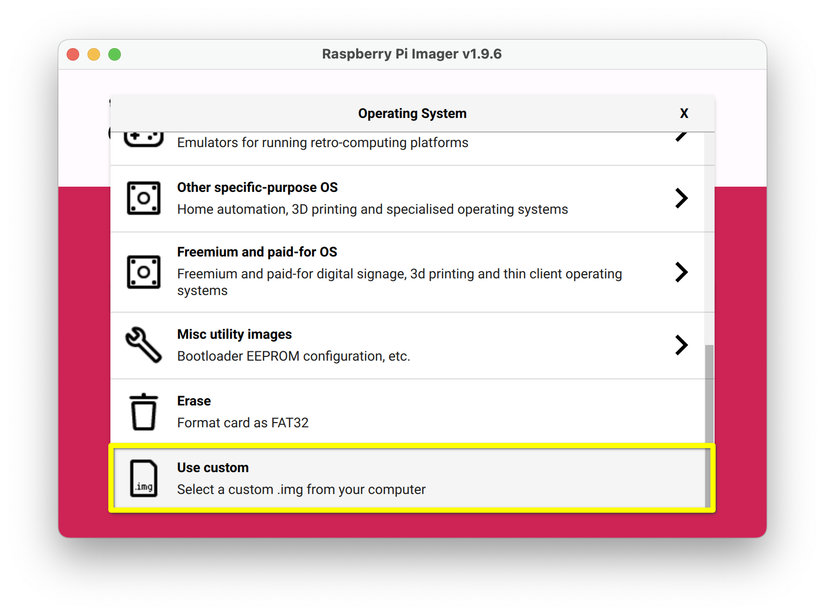
Browse to the location of your Linux distro’s image file and open it.

With your image file selected, plug in your USB drive if you haven’t already, and in Imager click “Choose Storage.”
You’ll see a list of available drives. In our example image, there’s only one, but you may see multiple. Select the drive you want to write the image to, making absolutely sure it’s the correct drive.

With your image file and storage drive selected, click Next.
You’ll be asked to confirm you don’t mind erasing everything on the USB drive you chose, so if you’re sure, click “Yes.”

Now you just have to wait while the image writing happens. This can take several minutes, so be patient.

When it’s complete, you’ll see a “Write Successful” message. Click “Continue,” and you can now proceed with booting your live Linux distro.

How to Make a Bootable Linux Drive on Linux
To make a bootable Linux drive on a computer that’s already running a Linux distribution, the most widely available and consistently reliable app that’s also easy to use is Impression. It’s available as a Flatpak, so it can be installed on any distro. You just need to already have installed Flatpak’s backend.
To install Impression, get it from the Flathub store. If your distro’s software manager already uses Flathub repos, you can find it there too by searching for Impression. If you want to install via the terminal, use this command:
flatpak install flathub io.gitlab.adhami3310.Impression
Using Impression is very simple. Plug in your USB drive if you haven’t already, and then launch Impression and click the “Open File” button, which will bring up your file browser.
Locate the distro image file you downloaded and open it.

Next, Impression will ask you to select the drive to install the image file on. Confirm you’ve selected the correct USB drive—you don’t want to accidentally overwrite a different drive with important files! Then click the “Write” button.
Impression will ask you one more time to confirm you’re OK with erasing the drive and overwriting with the image file. You’ll then likely be asked to enter your root password, which is typically required for Linux apps that are trying to erase a disk.

Then you simply have to wait. The time it takes will depend on the size of the image file, your USB port’s data rate, and the write speeds of the thumb drive.

You’ll get a nice big writing completion confirmation when the process is done. Click “Finish.”

If you’re removing the drive, confirm it’s been ejected, and you’re ready to go with your bootable Linux drive.
Other Options for Writing Images
If the apps I went over don’t work for you for some reason, there are other potential options. On Windows and Linux, I also recommend Ventoy, which actually lets you write multiple ISOs to the same drive. It’s meant for advanced users, and that’s why it isn’t the first thing I recommend.
On Linux, there are several options specific to certain distros, like Fedora Image Writer for Fedora, KDE Image Writer for Kubuntu and other KDE Plasma-enabled distros, and Mintstick for Linux Mint. You’re welcome to give them a try, especially if you’re already using a relevant distro. In my experience, though, it’s hit-and-miss whether they’re available in your repo and how well they work outside the Linux distros they were designed for.

Related
Here’s What to Expect When You Install Linux Mint
Let’s embark on a Linux adventure, step-by-step.
Not sure what to do once you have your bootable Linux drive created?
To boot a PC from a USB drive, you’ll need to enter the BIOS. Check out our guides to entering the BIOS on Windows 10 or entering the BIOS on Windows 11. Linux folks can enter the BIOS by accessing the GRUB boot loader and selecting the item labeled “UEFI firmware settings” or something similar. Then look for the boot menu.
If you’re an Apple fan, see our complete guide to booting an external drive on Mac.